Assemblies made with Geneious, CLC Workbench, BWA, and others are usually output in BAM file format. When you create a templated assembly in SeqMan NGen, the .assembly package output contains the reference sequence(s) as well as feature information and variant calls. By contrast, BAM files lack these types of information, and multiple files need to be imported to get a complete picture of the data.
The following instructions show how to add BAM files, references, and General Feature Format (.gff) files, an optional type of file required to view features. During the importation of these files, GenVision Pro automatically performs variant calling, allowing you to later create tables of variants and structural variations and to view variants in the Analysis view.
To add BAM files to the GenVision Pro session:
- Do any of the following:
- Drag & drop one or more .bam files from your computer’s file explorer onto an open GenVision Pro session.
- From the New tab on the Welcome screen, choose Add BAM alignments to new session.
- Press the Add BAM alignments to session tool (
).
- Choose File > Add BAM Alignments.
- Drag & drop one or more .bam files from your computer’s file explorer onto an open GenVision Pro session.
- A file chooser is displayed. Navigate to and select the desired .bam alignment(s), then press Open.
- Use the References drop-down menu to choose either Each reference is in a separate file or All references are in one file. Note that the reference can be a genome template package downloaded from DNASTAR, or another reference of your choice.
- If your references are a set of .gbk or .fasta (or .fas) files, often one file per chromosome, choose Each reference is in a separate file. Initially, you will see yellow “warning” triangles to the left of each sequence. This indicates that the sequence still needs an associated reference sequence. Start by importing references until all the warnings have disappeared.
GenVision Pro automatically assigns references to their corresponding samples. If GenVision Pro detects that the references are from the wrong organism or otherwise incorrect, it will not assign them to any samples.
- To add one or more references sequences, press Add References. Once you have added references, this button changes to Replace References.
- To add additional .bam files, press Add BAM Files.
- To remove a file that is already in the Input table, select the sample row and press Remove BAM Files.
- To add one or more references sequences, press Add References. Once you have added references, this button changes to Replace References.
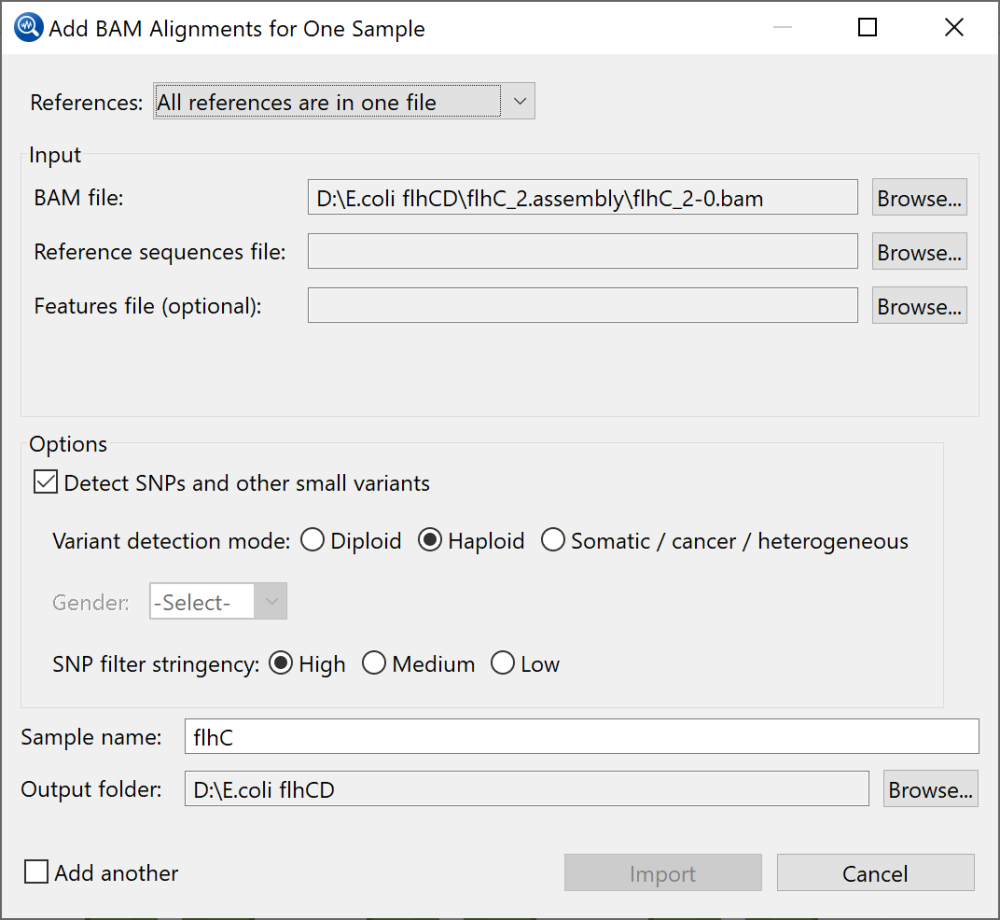
- If your reference consists of one .fasta (or .fas) file with a separate .gff file containing features, choose All references are in one file. The dialog appears as in the image below.
- To add a reference sequence, use the Browse button to the right of Reference sequences file.
- To add a General Feature File (.gff), use the Browse button to the right of Features file (optional).
- To switch to a different BAM file, use the Browse button to the right of BAM file.
- To add a reference sequence, use the Browse button to the right of Reference sequences file.
- If your references are a set of .gbk or .fasta (or .fas) files, often one file per chromosome, choose Each reference is in a separate file. Initially, you will see yellow “warning” triangles to the left of each sequence. This indicates that the sequence still needs an associated reference sequence. Start by importing references until all the warnings have disappeared.
- (optional) To enable SNP detection, start by checking Detect SNPs and other small variants.
- Use Variant detection mode to specify genome ploidy for SNP detection purposes. Choosing Haploid or Diploid establishes the statistical model used in estimating the probability that a given called variant is real (i.e., that the sequence really differs from the reference). Selecting Somatic/cancer/heterogeneous (e.g. for a polyploid genome, cancer panel, etc.) prevents SeqMan from calculating probabilities.
- If the Gender checkbox is present, specify the gender of the subject (Male/Female), if known. Otherwise, select Unknown. This checkbox appears only if you are using a DNASTAR genome template package and have chosen a genome ploidy other than Haploid. Note: Selecting Female means the diploid caller will be used for all chromosomes, including X. Selecting Male means the haploid caller will be used for chromosomes X and Y. Calls on mitochondria use the haploid caller for both sexes.
- SNP filter stringency can be used to adjust the extent of overlap data required to include a putative match in the final layout. The radio buttons specify stringency levels for “soft” filtering of SNPs. Soft filtering means that SNPs of the least interest to you will be automatically hidden in GenVision Pro’s Variants view. Your selection in this screen controls the three assembly parameters shown in the table below.
- High has Min SNP%=15, PnotRef%=99.9, and Depth=20. This option has a lower false discovery rate (FDR) for SNPs and is recommended for whole genome workflows.
- Medium (where available) has Min SNP%=15, PnotRef%=99, and Depth=20.
- Low has Min SNP%=15, PnotRef%=90, and Depth=20. This option has a higher true positive rate (TPR) for SNPs and is recommended for all workflows other than whole genome.
- High has Min SNP%=15, PnotRef%=99.9, and Depth=20. This option has a lower false discovery rate (FDR) for SNPs and is recommended for whole genome workflows.
- Use Variant detection mode to specify genome ploidy for SNP detection purposes. Choosing Haploid or Diploid establishes the statistical model used in estimating the probability that a given called variant is real (i.e., that the sequence really differs from the reference). Selecting Somatic/cancer/heterogeneous (e.g. for a polyploid genome, cancer panel, etc.) prevents SeqMan from calculating probabilities.
- Name the sample by typing text into the Sample name field. This field is highlighted in yellow until you input a name.
- When you import BAM files, GenVision Pro reprocesses them using the same XNG assembly engine used by SeqMan NGen. In essence, GenVision Pro does a “mini” assembly. Therefore, you need to specify a folder for this assembly output. Choose the Output folder using the Browse button on the right. The Output folder field is highlighted in yellow until you choose a location.
- Press Import to import the samples listed in the Input section above. If you wish to add another sample file in .bam format, check the box next to Add another before pressing Import. The additional sample must use the same reference sequence(s) that you already imported in the earlier steps above.
After pressing Import, the BAM file import will show up as an “in progress” job in the Jobs panel. Small jobs will take only a few minutes, while samples using the human genome as the reference can take about an hour to process. While the job is in progress, you will receive a warning if you attempt to close GenVision Pro. However, you can work on additional GenVision Pro sessions while your job is processing. You can also track the progress of the job in the Console view.
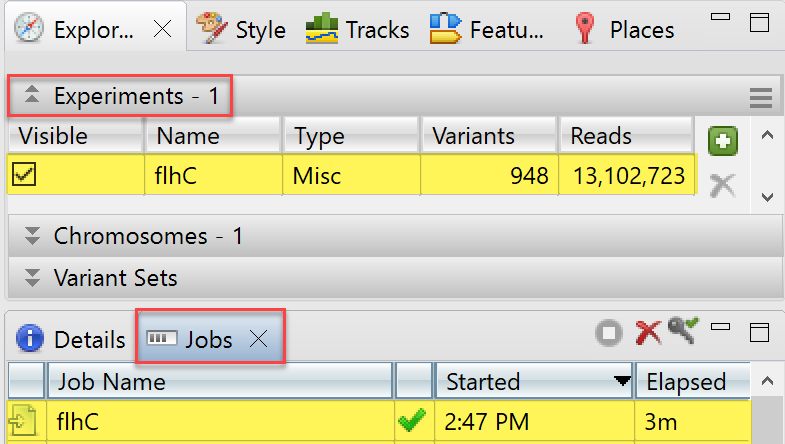
Once the BAM file has been imported, a green checkmark appears in its row in the Jobs panel. The file also appears in the Experiments section:

Need more help with this?
Contact DNASTAR


