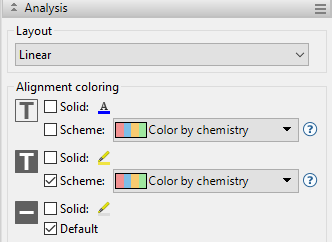
The Analysis section contains options affecting the wrapping style for rows in the Analysis view. To access it, click on the Style panel expand bar entitled Analysis, or choose View > Style > Analysis.

The following table shows tasks that can be performed using the Analysis section.
| Task | How to… |
|---|---|
| Select the preferred line wrapping style | Use the Layout drop-down menu:
|
| Specify the color of sequence characters | Use the “foreground color” tools to the right of  . To display the letters in a single solid color of your choice, check the box next to Solid. Then click on the ‘A’ tool to the right of the checkbox and choose a color from the color picker. To instead choose a preset color scheme, check the box next to Scheme and make a selection from the drop-down menu. You can toggle between checking and unchecking the Scheme box using the Analysis > Color Sequence Foreground menu command.To learn more about available color schemes, click here. . To display the letters in a single solid color of your choice, check the box next to Solid. Then click on the ‘A’ tool to the right of the checkbox and choose a color from the color picker. To instead choose a preset color scheme, check the box next to Scheme and make a selection from the drop-down menu. You can toggle between checking and unchecking the Scheme box using the Analysis > Color Sequence Foreground menu command.To learn more about available color schemes, click here. |
| Specify the background color (boxes around each letter) | Use the “background color” tools to the right of  . To use a single solid color of your choice, check the box next to Solid. Then click on the ‘highlighter pen’ tool to the right of the checkbox and choose a color from the color picker. To instead choose a preset color scheme, check the box next to Scheme and make a selection from the drop-down menu. You can toggle between checking and unchecking the Scheme box using the Analysis > Color Sequence Background menu command. To learn more about available color schemes, click here. . To use a single solid color of your choice, check the box next to Solid. Then click on the ‘highlighter pen’ tool to the right of the checkbox and choose a color from the color picker. To instead choose a preset color scheme, check the box next to Scheme and make a selection from the drop-down menu. You can toggle between checking and unchecking the Scheme box using the Analysis > Color Sequence Background menu command. To learn more about available color schemes, click here. |
| Specify the background color for gaps | Use the “background color for gaps” tools to the right of  . To use a single solid color of your choice, check the box next to Solid. Then click on the ‘highlighter pen’ tool to the right of the checkbox and choose a color from the color picker. To choose the default (light gray), check the box next to Default. To learn more about available color schemes, click here. . To use a single solid color of your choice, check the box next to Solid. Then click on the ‘highlighter pen’ tool to the right of the checkbox and choose a color from the color picker. To choose the default (light gray), check the box next to Default. To learn more about available color schemes, click here. |
Need more help with this?
Contact DNASTAR


