Lasergene Genomics’ ChIP-Seq analysis workflow enables you to locate the binding sites of DNA-associated proteins and determine how these proteins interact with the DNA to affect expression in nearby genes.
In this tutorial, you will use SeqMan NGen to create a ChIP-Seq assembly for two experimental replicates and one wild type control of E. coli transcription factor FlhD. Once the assembly is complete, you will import the data into ArrayStar’s ChIP-Seq workflow and filter the results for IP fragments that match in both replicates, and that meet a specified signal threshold. Finally, you will look for genes that the fragments intersect, and see whether they share any common characteristics.
Setting up and running the assembly in SeqMan NGen:
- Download T2_ChIP-Seq.zip (2.4 GB) and extract the contents to any convenient location (e.g., your computer’s desktop). The folder contents consist of:
- The E. coli reference sequence: Escherichia coli str. K-12 substr. MG1655.U00096.gbk
- The sample sequences: six folders beginning with flhC, flhD and WT.
- The E. coli reference sequence: Escherichia coli str. K-12 substr. MG1655.U00096.gbk
- Launch SeqMan NGen and choose New Assembly.
- Choose RNA-Seq / Transcriptomics on the left, then choose ChIP-Seq on the right.
- In the Reference Sequence screen, click Add and add the reference sequence MG1655_U00096.3.gb. Press Next.
- In the Input Sequences screen, uncheck the box next to Paired-end reads. Press the Add Folder button to add the folder starting with WT. Do the same for each of the next two sample folders. Click Next.
- In the Set Up Experiments screen, check the box to the right of WT_rep1, indicating that it is the control. Press Next.
- In the Assembly Options screen, check the box next to Maximum total reads and enter 5000000 (5 followed by 6 zeros) to reduce the assembly time. Click Next.
- In the Analysis Options screen, leave the ChiP-Seq detection method at MACS and press Next.
- In the Define Binding Proteins screen, use the Known binding site motif drop-down menu to select Transcription Factor Database. Use the Organism drop-down menu to select Bacteria. Press Select and choose FlhCD_CS / FlhCD, then press OK.
Press Next.
- In the Assembly Output screen, type “ChIP-seq” into the Project Name text box. Use the Browse button to specify a Project Folder for your assembly output files, then press Next.
- In the Run Assembly Project screen, check whether the recommendation is to run the assembly locally or on the cloud. Press the corresponding link to begin assembly. Typical assembly times are 20 minutes (cloud) or 30-45 minutes (local).
- Wait until being informed that assembly has finished, then click Next.
- From the Assembly Summary screen, click Analyze peaks to open the results in ArrayStar.
Analyzing the results in ArrayStar:
- In ArrayStar, click on the Fragment Table tab and ensure that approximately 40 IP fragments were found.

- Similarly, click on the Peak Table tab and ensure that about 50-60 peaks were found.
- To filter for fragments found in both replicate samples, choose Filter > Filter All and make selections to match the image below.
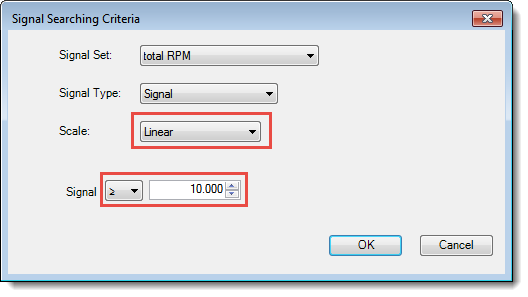
- Press the Choose Signal Criteria button and make selections to match the following image. Press OK.

- Press Search. The search should yield about 17 IP fragments.
- Press the Select and Show Results in IP Fragment Table tool (
), located above the result table.
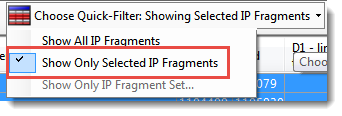
- In the Fragment Table, use the Quick-Filter tool to choose Show Only Selected IP Fragments.

- Click on Add/Manage Columns. In the IP Fragment Info section, choose Intersecting Genes, then >Add Column>, then OK.
- Look at the newly-added column and note that many of the fragments intersect genes beginning with “flg”, “fli” and “flh”.

These are the major genes for producing flagella in E. coli and are known to be regulated by the transcription factor encoded by the flhC and flhD genes. The che gene is involved in chemotaxis and are also known to be regulated by FlhCD.
This marks the end of this tutorial.
Need more help with this?
Contact DNASTAR


 ), located above the result table.